DAC Portal
Welcome to the DAC Portal documentation!
If you are involved in governance or legal aspects, technical or operational aspects, or serving as a data steward, this page will be helpful for you. By exploring these materials, you can define your own Data Access Committee (DAC) and policies, understand the minimal requirements for a DAC and a policy object, and comprehend how the EGA data access requests are managed.
DAC Portal Index
Setting up your account
- Register yourself as an EGA user.
- The Helpdesk team will validate your account (this could take up to 48 hours). After validation, you will receive an email with a link to verify your email - Make sure you click on the link to verify your account!
- If you don’t receive the email, please check your spam folder.
- Once your account is active you can login to the DAC Portal.
We recommend you to check out the Take The Tour!
DACs and Policies
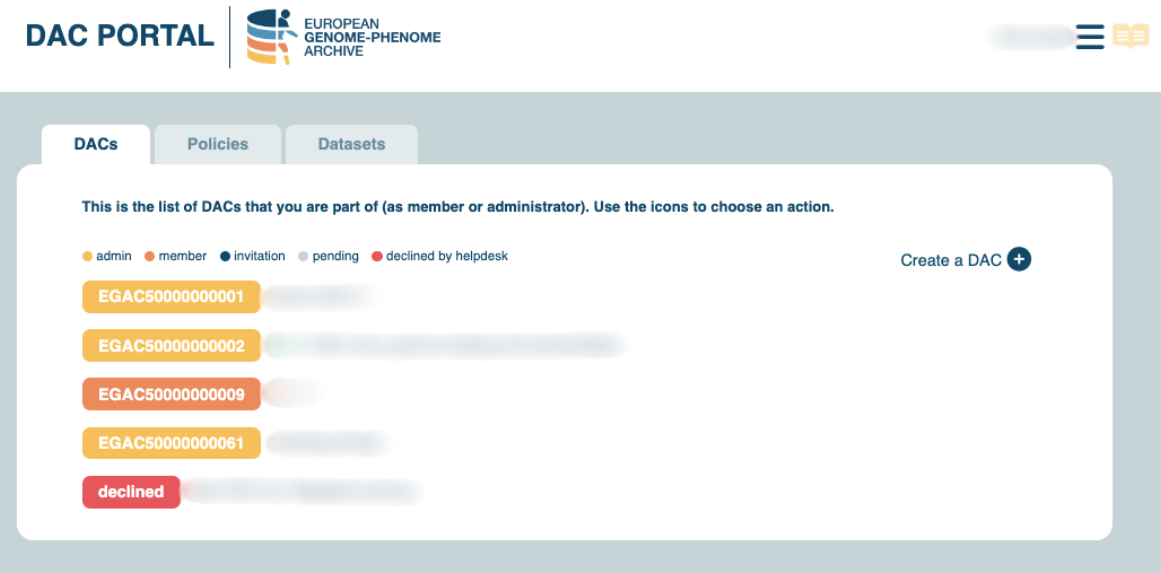
Create a DAC
- Click on Create a DAC
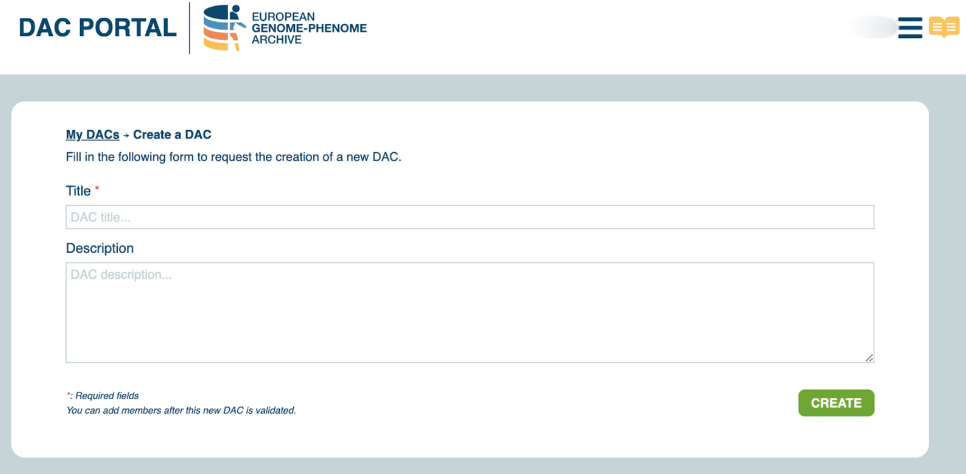
- Add the title and description to your DAC. Once ready, click on the ‘Create’ button.
- You will have to wait until the Helpdesk Team validates the creation of your DAC. Once approved by Helpdesk, your DAC will be assigned with a persistent identifier (EGAC).
Edit a DAC
- Once your DAC is registered and approved, you can edit it and add contacts. Remember, you can add as many contacts as needed. And, you can also remove/add contacts anytime.
- To add a contact, you must write the username or email of a registered EGA user in the Members field. Once you have typed the whole username or email, a drop-down menu will appear where you can select the contact.
- Select a contact from the drop-down menu. Make sure you write the full username or email of the contact so it appears as an option.
- Make sure that you select one main contact.
- Set up the role you want to grant to the new contact of the DAC.
- After adding all the necessary contacts and assigning roles, click on Update. This will send an email notification to the new DAC member, letting them know about the invitation to managing the DAC. Once they log into the DAC Portal, they will be able to either accept or turn down the invitation.


We recommend you to check out the FAQ to learn more about the different roles!
Create a policy
First, please note that all information registered in a policy metadata object will be publicly available on the EGA website. For each released dataset, all users will be able to read the policy under the “Data Access” tab.
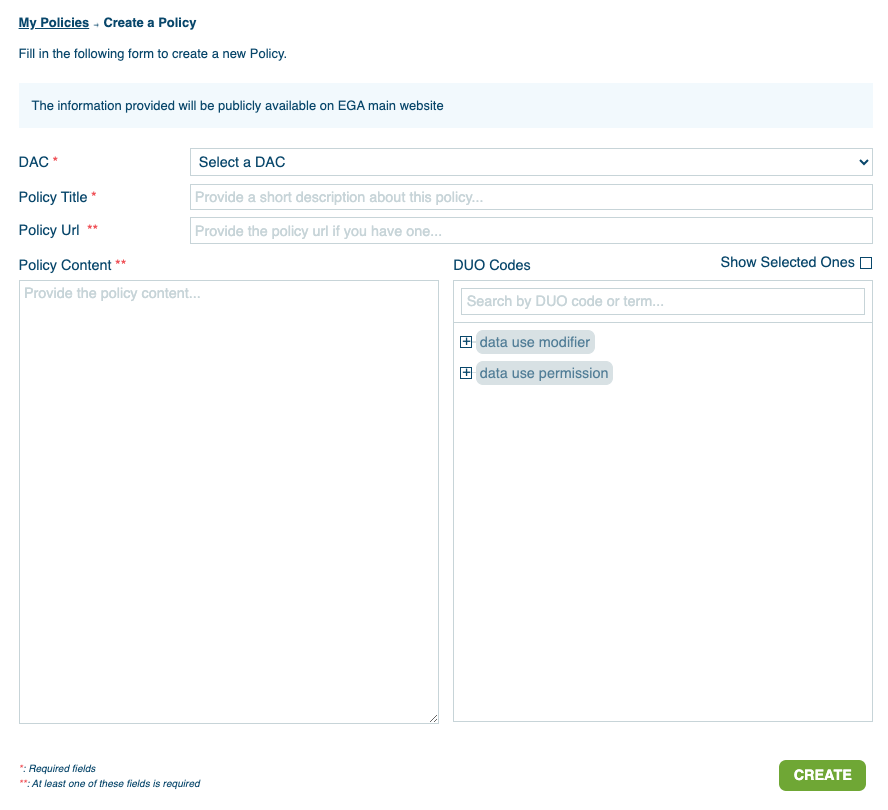
- Select Create a Policy from the Policies tab.
- Select the DAC that you want your policy to depend on. Add the title and terms and conditions for accessing and using your data. If you already have an external website for data access requests, you can add the URL directly here (see example here).
You can find a template of a Data Access Agreement (DAA) document in our Policy documentation page. The DAA template is provided for guidance only and should be adapted to suit your own purpose depending on the security policies, terms for publication or embargoes, and restrictions on data use or sharing. - You can also add Data Use Ontologies (DUO) to your policy. These DUO codes are used to semantically tag the terms and conditions of using the data linked to the policy (example). For more information, you can refer to the Data Uso Ontology documentation.
- Once completed, make sure to click the Create button in order to register your policy. A persistent identifier (EGAP) will be assigned automatically.

Edit a policy
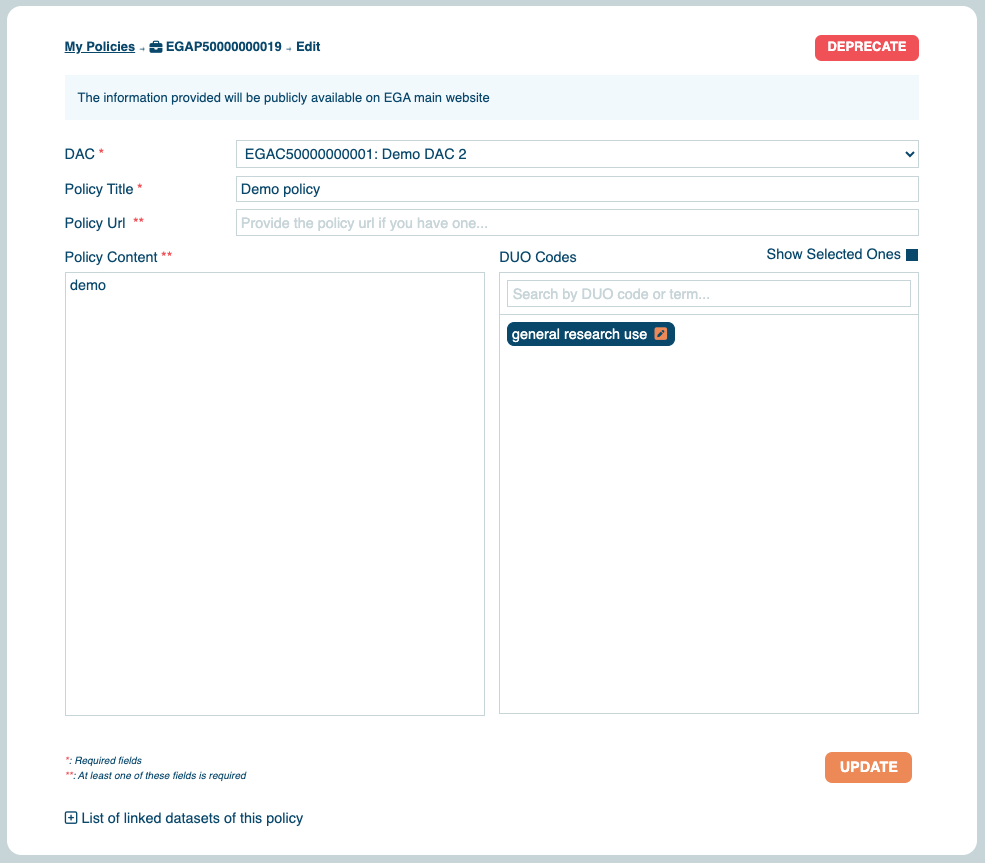
Please, note that you will not be able to edit the policy if it shows in orange. Meaning that you are a member of the DAC linked to that policy. Members don’t have edit rights. Only admins can edit objects.
- You can check your registered policies on My policies, available at the menu in the top-right corner.
- Select your policy. It will then display the information of that policy, allowing you to edit the information.
- Once you are done with the modifications, click Update.
Pending Requests Table
Table Settings
Upon selecting a specific DAC, you will be presented with a customisable table showcasing all pending data access requests. This table allows you to tailor the displayed information according to your preferences by selecting desired columns.
Available Columns (Displayed with the Eye Icon):
- Date: The date when the data access request was submitted.
- Full Name: Name and surname of the user submitting the request.
- Email: Email address associated with the user's request.
- Username: The username linked to the EGA account of the user submitting the request.
- Organisation: Affiliated organisation of the user submitting the request.
- Dataset: EGA accession ID for the requested EGA dataset.
- Dataset Title: Title of the requested dataset.
- DAC Comment: Space provided for internal comments related to the request.
- Expiration: Option to specify an expiration date for granted permissions.
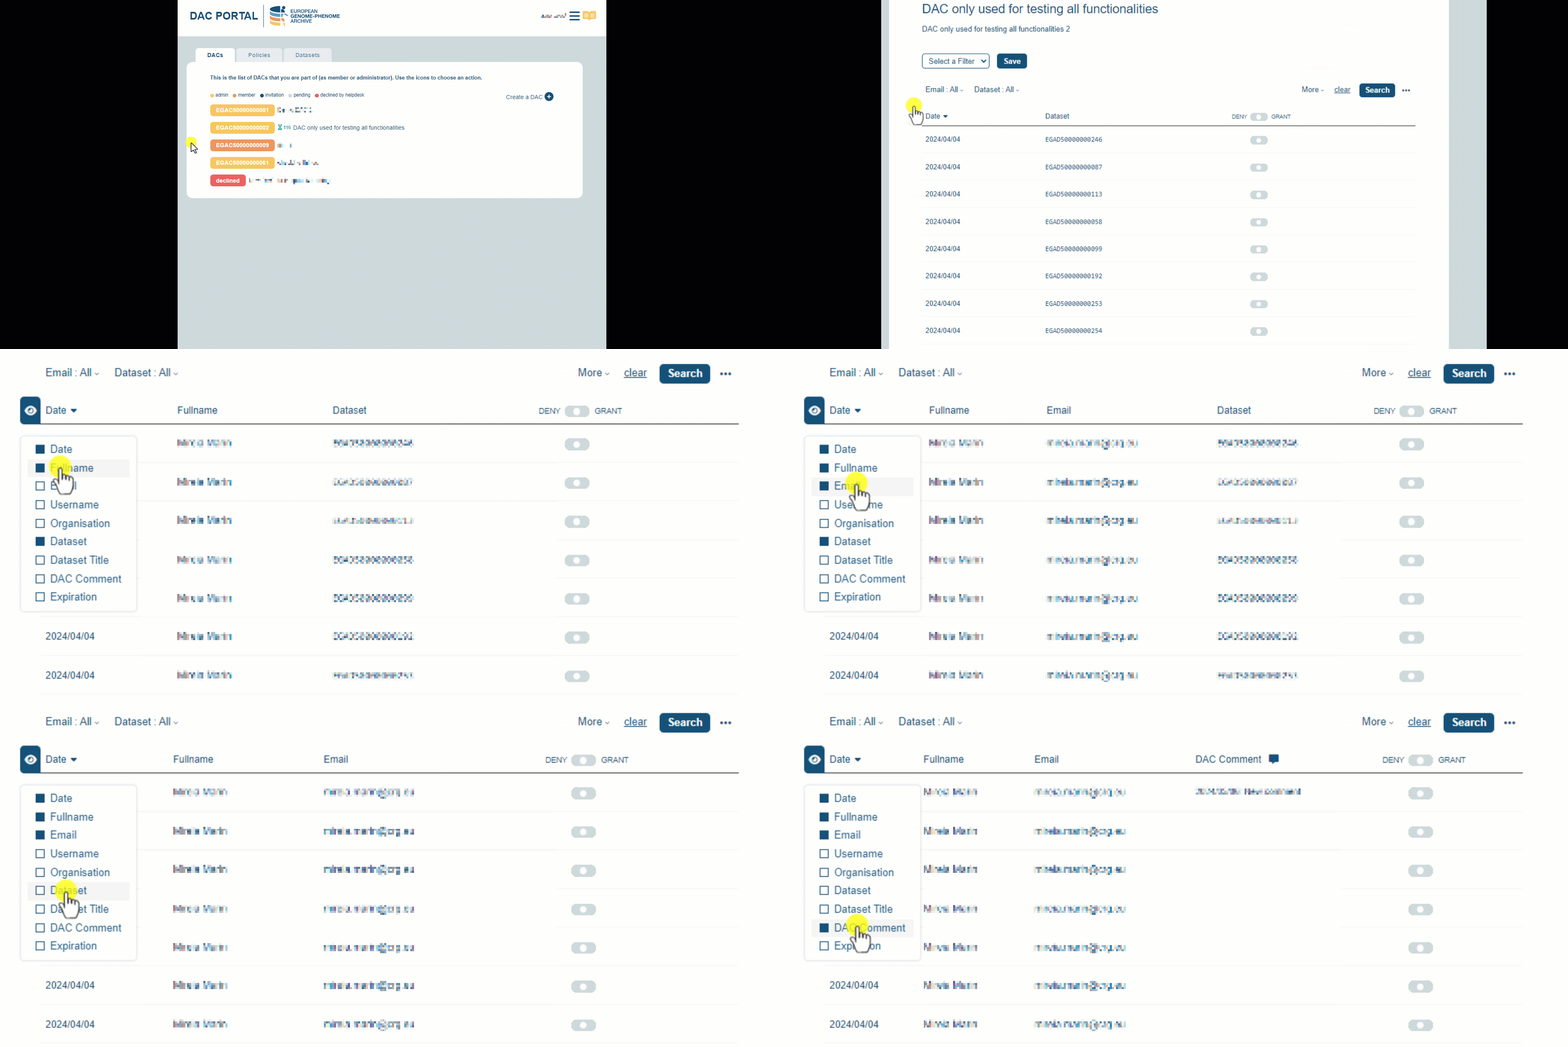
Check more information on the pending request table here!
Table Filters
By default, all data access requests are displayed. However, you have the option to apply filters to refine your view. Follow these steps to apply filters:
- Click on the More button. This action will reveal the different columns available for applying filters.
- As you select columns, the checked fields will be displayed at the top of the request table.
- Choose the specific values within the selected columns that you want to filter for.
- Click the Search button to apply the selected filters.
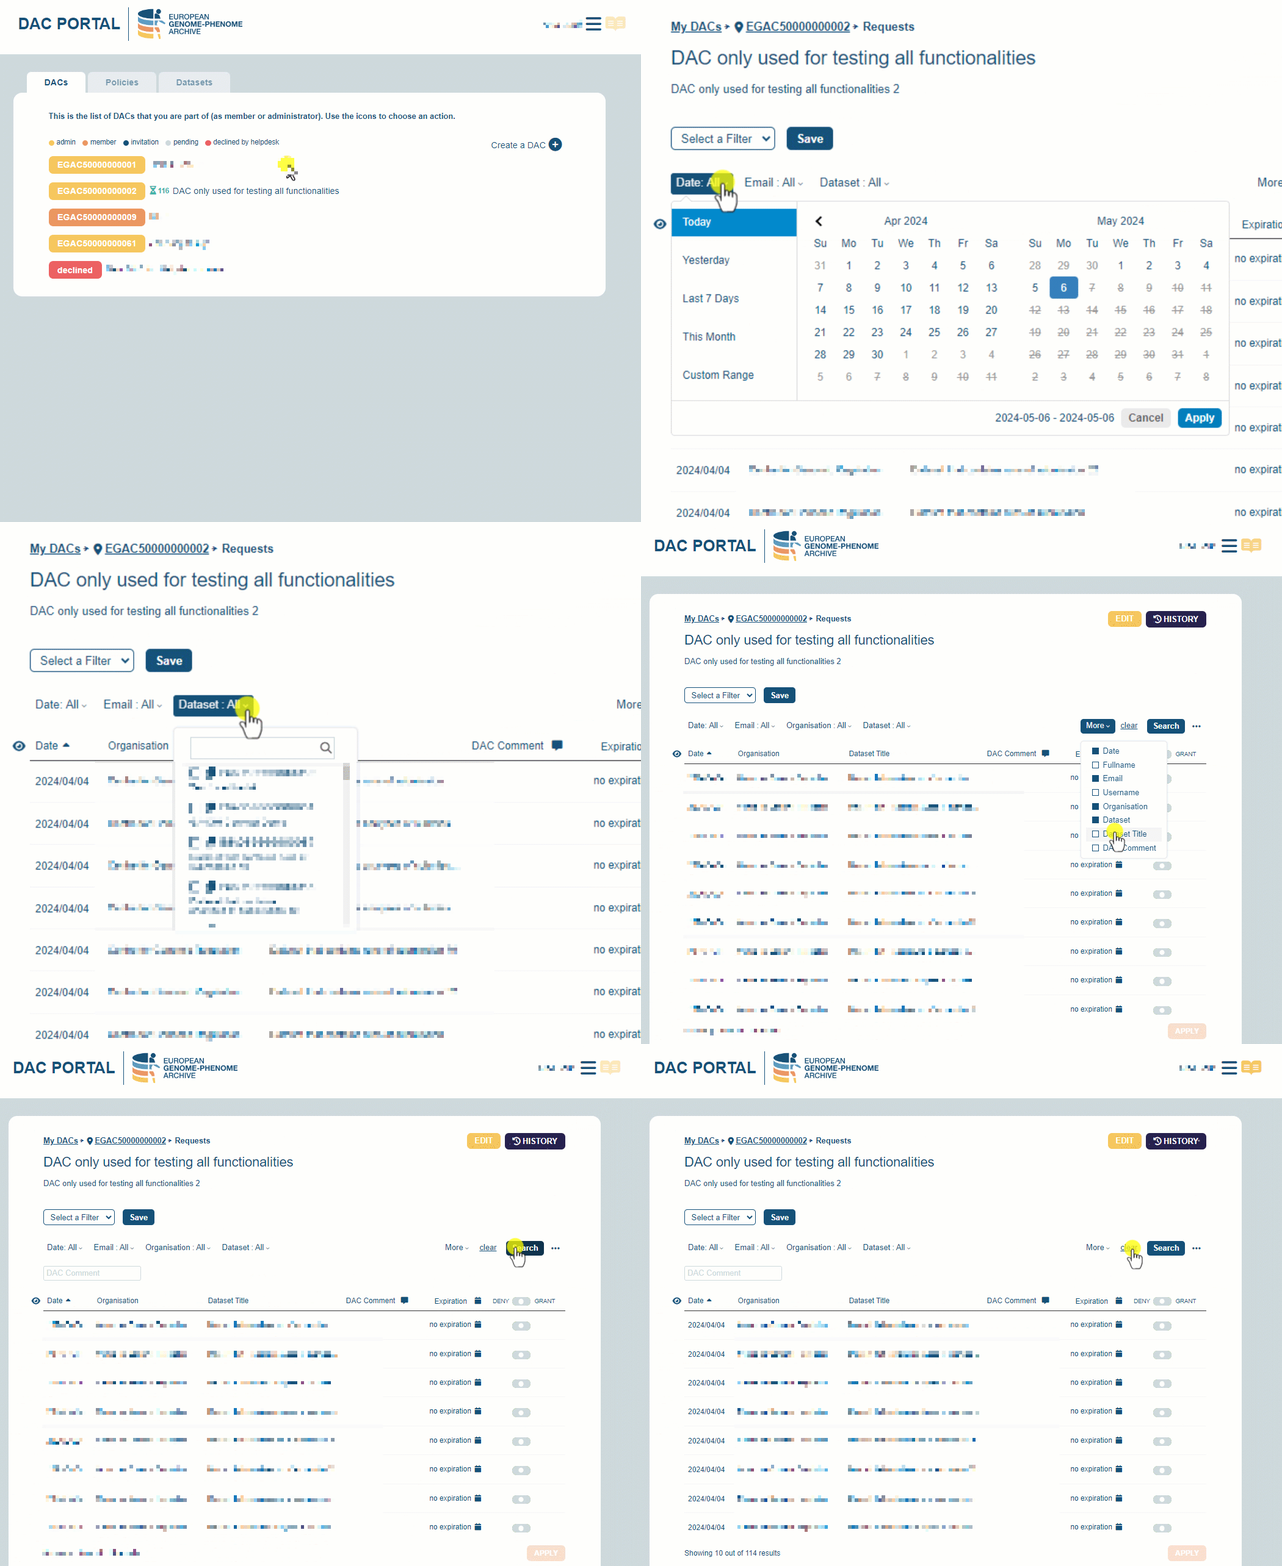
Do you find yourself frequently applying the same filters? You can save multiple combinations of filters for easy access at any time! Here's how:
- Click the Save button.
- Provide a descriptive name for the filter combination.
- Click Save to confirm.
- To load saved filters, simply select the saved filter from the dropdown menu to apply it automatically.
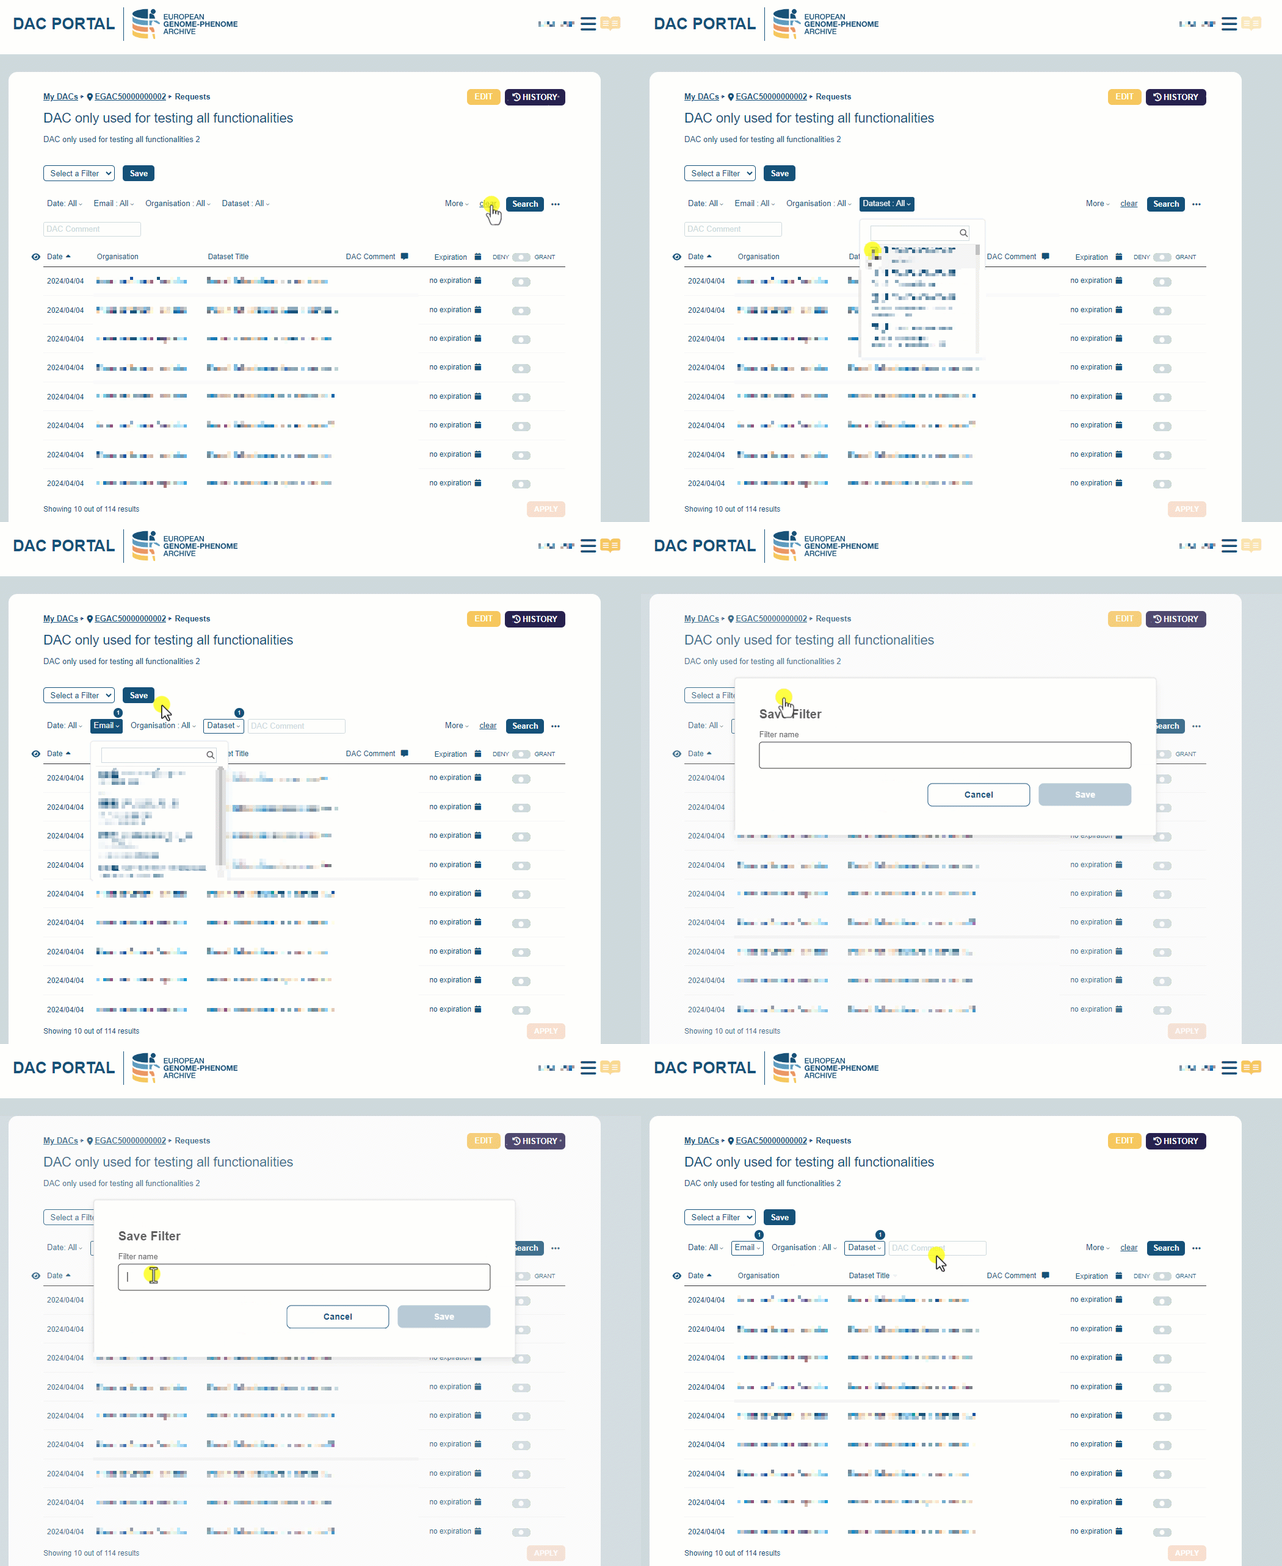

Check more information on filters here!
Advanced Search
For users requiring more granular control over their data access requests, the DAC Portal offers an Advanced Search feature using JIRA Query Language (JQL). With JQL, you can craft precise and complex queries to filter and retrieve specific data access requests based on various criteria such as date, user details, dataset attributes, and more.
Using JQL's flexibility, you can create custom queries to meet your specific needs, allowing for advanced filtering options beyond the standard filters provided.
You can find the Advanced Search feature following these steps:
- Click the … button
- Select Advanced
- To view the allowed fields for filtering and explore all available options, simply click on the info icon.
- Once you have written the filtering values, click the Search button to apply.
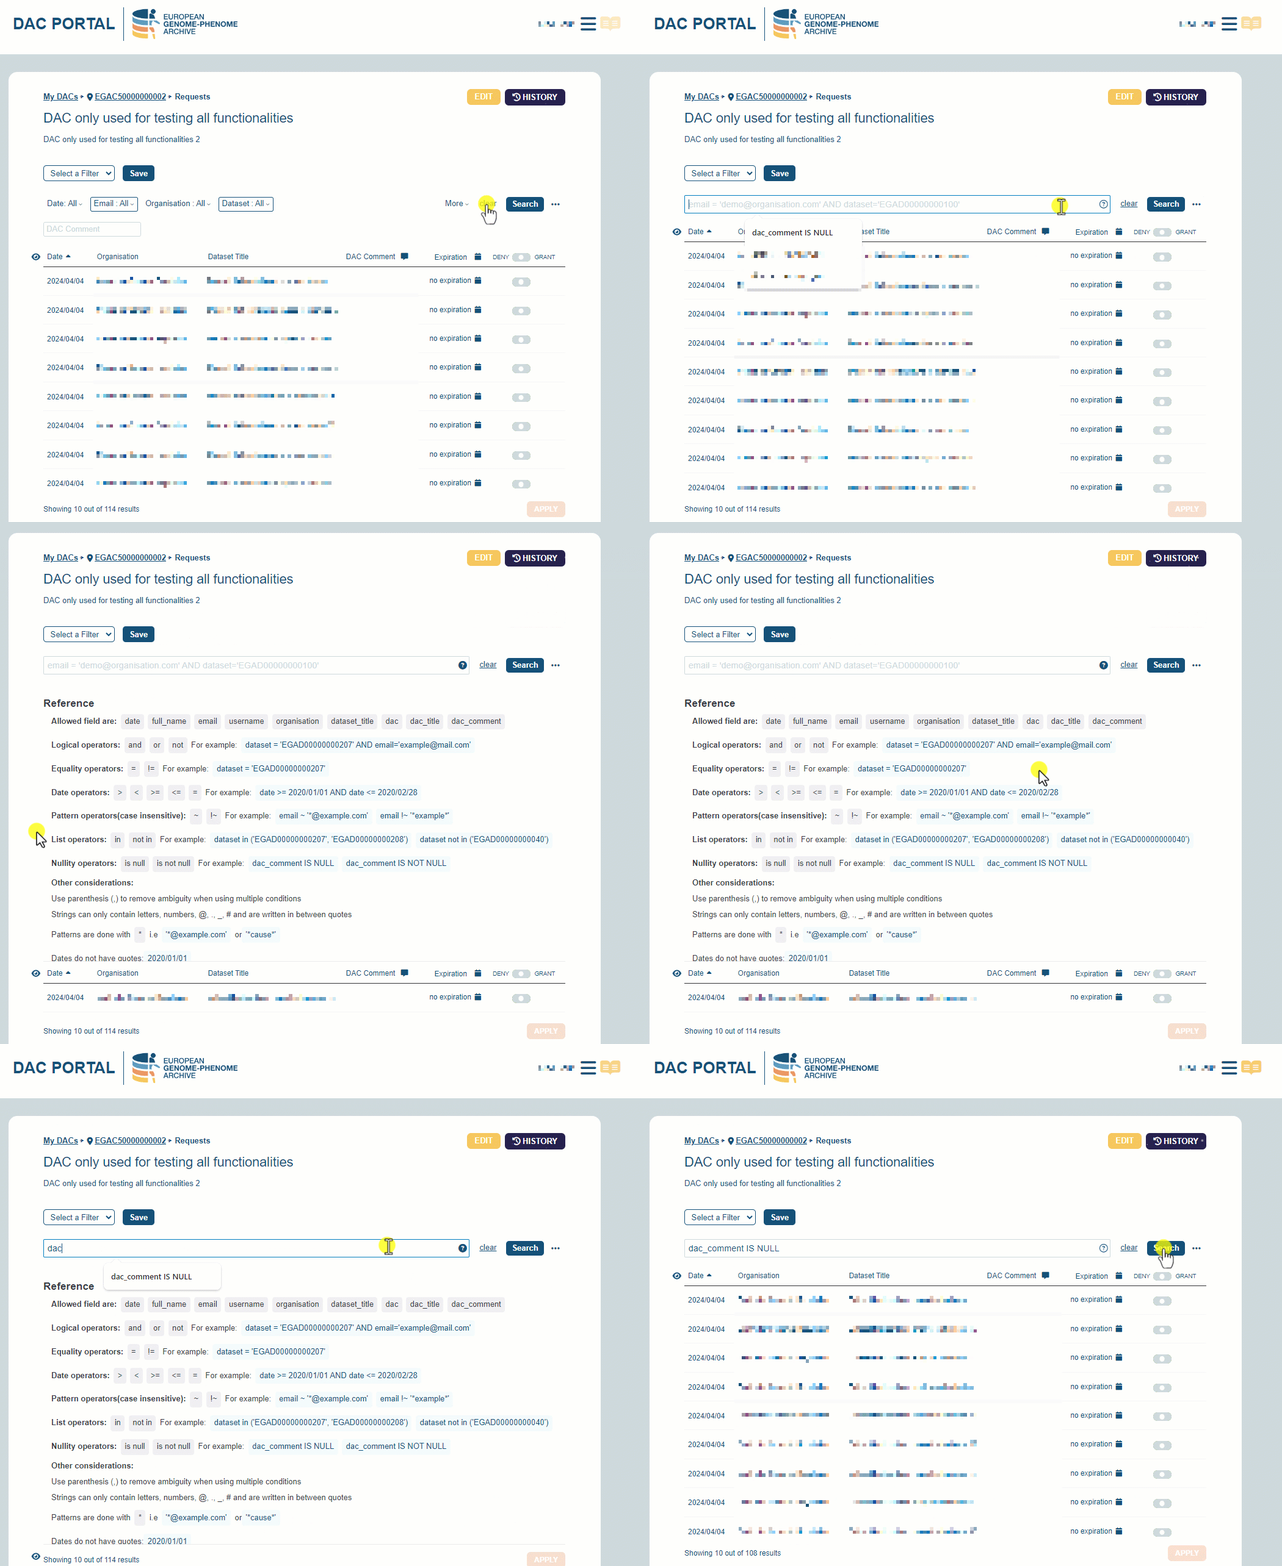
Check more information on filters here!
Manage Data Requests
Upon logging into the DAC Portal, you'll notice a sand clock icon next to the DAC ID, indicating the number of pending requests. Click on the DAC to review these requests.
Accept requests
- Click on the right side of the toggle button to grant access to the user.
- You can manage other requests before proceeding to the next step.
- After managing the requests, click on the Apply button.
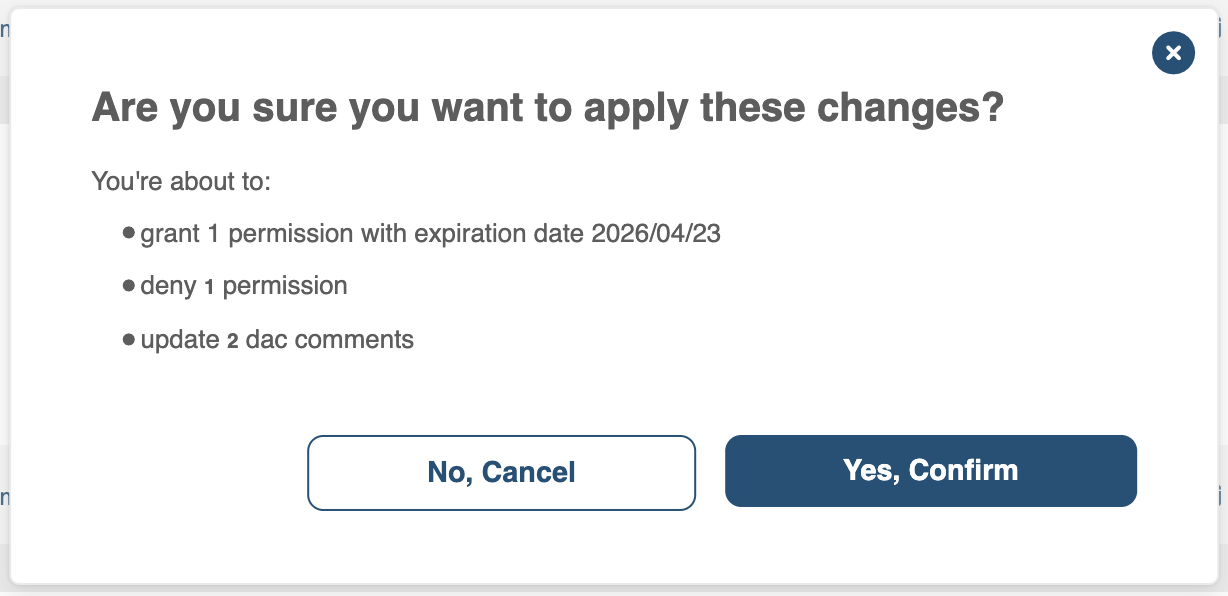
- A confirmation box will appear summarising the options to be applied. Click on Yes, Confirm to proceed with granting permissions.

Deny requests
- Click on the left side of the toggle button to deny access to the user.
- Provide a reason for the denial. Note that the user will receive an email with this reason.
- Click on the Done button.
- You can manage other requests before proceeding to the next step.
- After managing the requests, click on the Apply button.
- A confirmation box will appear summarising the options to be applied. Click on Yes, Confirm to proceed with denying permissions.

Tips!
- Apply a filter to view all requests to be managed at once.
- Use the toggle in the row with column names to grant or deny permissions for multiple requests simultaneously.
- You can grant and deny permissions in the same action, simplifying the process. The confirmation box will provide a summary of all actions, including grants, denials, DAC comments, and expiration dates.
History Page
The History page serves as a dedicated space to view information regarding all requests managed by all DAC members. Here, you can review active permissions and revoke them as needed.
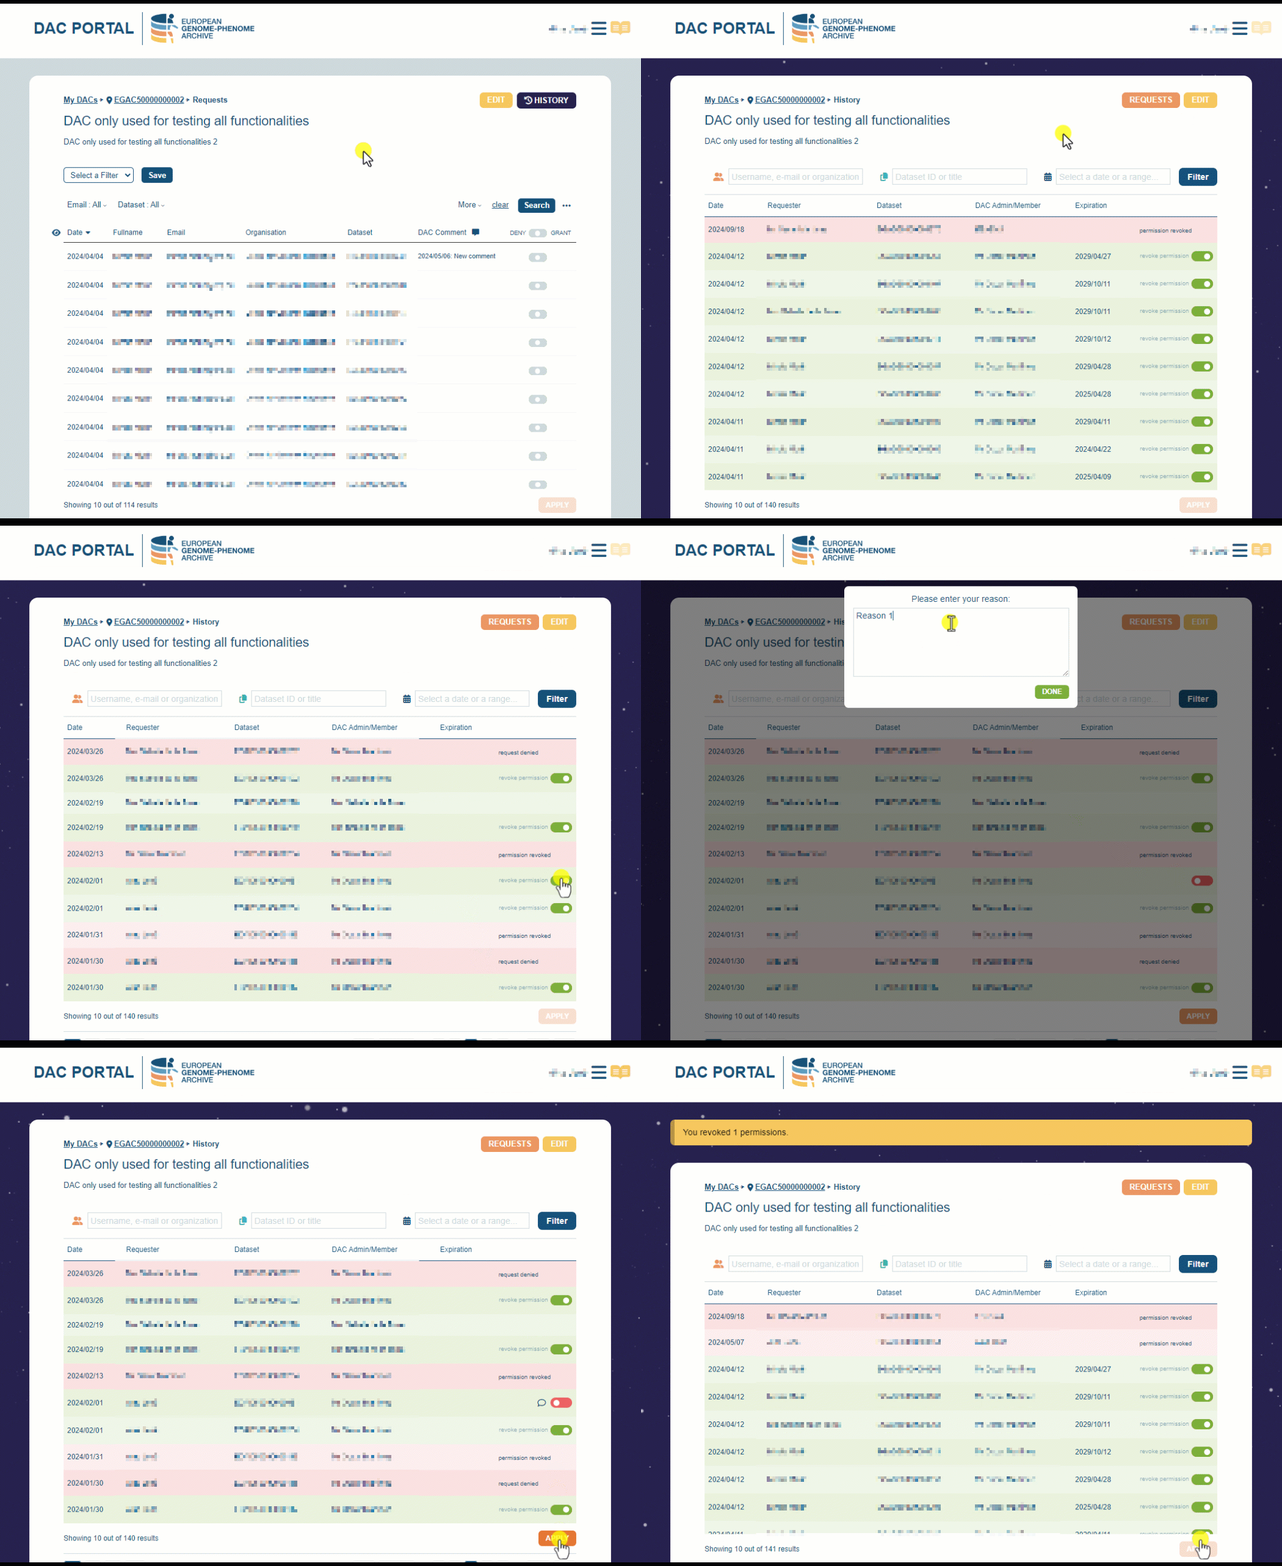
- Go to the History page by clicking on the "HISTORY" button from a DAC page in the DAC Portal.
- Here are the different row types you may find:
- Current permissions: row in green with a toggle button to revoke permissions on the right.
- Approved requests: row in green, with no toggle button.
- Request denied: row in red with “request denied” on the right.
- Permission revoked: row in red with “permission revoked” on the right.


Distinctions to Note!
- Between Request Denied and Permission Revoked:
- Request Denied: Refers to requests that were rejected from the outset, indicating that access to the dataset was never granted.
- Permission Revoked: Indicates that permissions were previously granted but have since been revoked. Users with permissions revoked have previously accessed the dataset.
- Between Approved Request and Current Permissions:
- Approved Request: Represents an entry when a data access request has been approved in the past.
- Current Permissions: Denotes ongoing permissions where a user has present access to the dataset. An approved request may now appear as Permission Revoked in the present.
By observing these different rows, users can gain insight into the complete history of a user's interactions and permissions regarding a dataset over time.
To revoke access to a specific user for a dataset, follow these steps:
- Go to History page
- Look for the row with the specific permissions. You can use the filters!
- Click on the toggle button to revoke access.
- Add a denial reason. Bear in mind that the requester will receive the denial reason!
- Click on the Apply button.
Check more information on the Hisotry page here!
Audit your metadata objects
In the DAC Portal, you can efficiently manage and audit various metadata objects pertinent to your role as a Data Controller.
Upon accessing the DAC Portal, you will encounter three primary tabs on the homepage:
- DAC: Contains information about Data Access Committees (DACs).
- Policies: Provides insights into linked policies.
- Datasets: Displays datasets and relevant details.

Whilst the lists give you a quick look, to check how things are connected, we've added a table at the bottom DACs and policies.
DACs
Let’s check which policies are linked to a specific DAC:
- Go to "My DACs."
- Select a DAC.
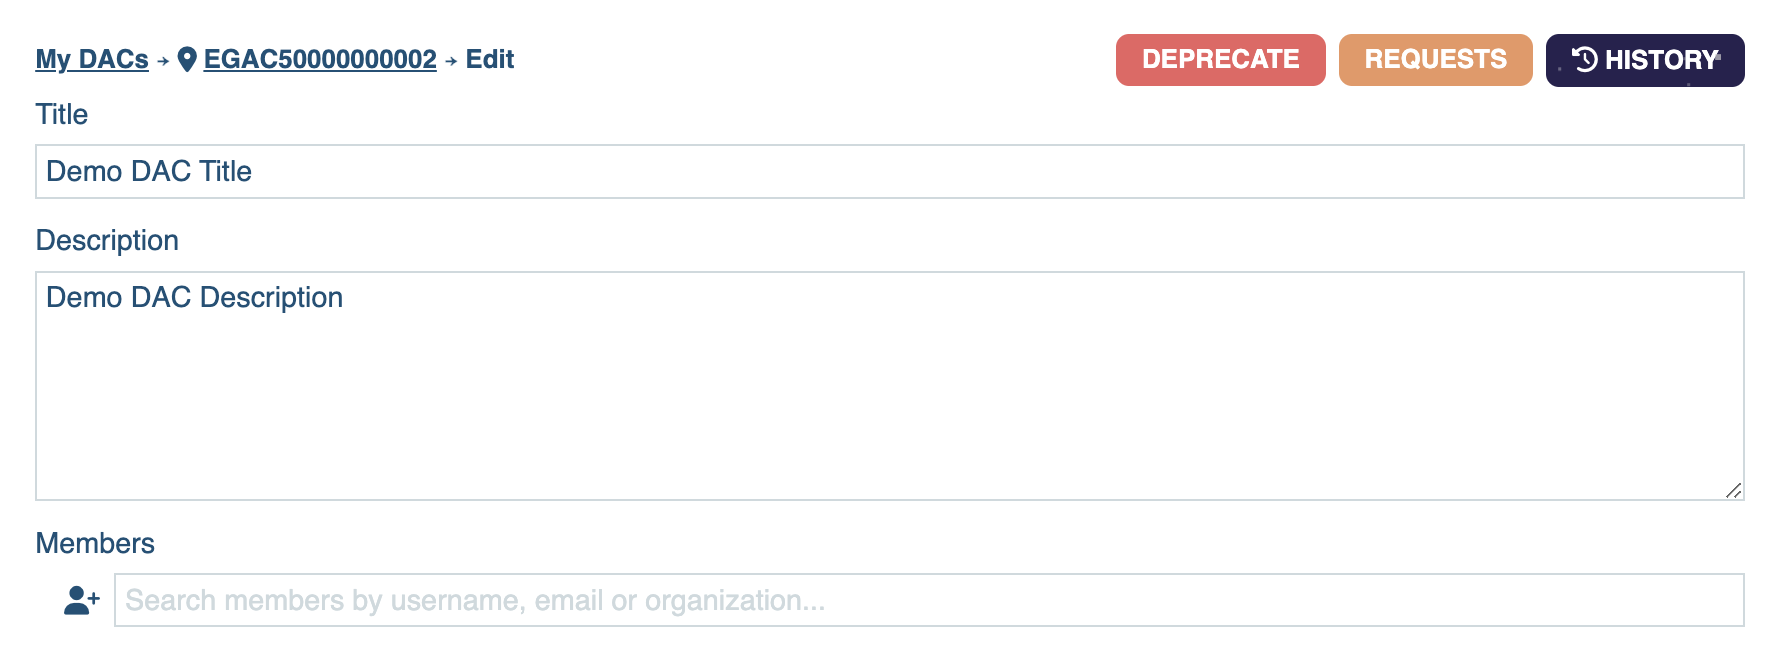
- Click on "EDIT" to see more details. You are now on this page:
- Scroll down to see the linked policies.
- Click on “List of linked policies of this DAC” and you will see a list of all policies linked to your selected DAC.

Policies
Do you want to view a list of datasets connected to a particular policy? Follow the same steps mentioned earlier, but head to the policy tab this time.
In the policy tab, you'll find a list of all your policies. Here, you may notice two different icons next to the policy ID (EGAP):
- DAC Icon (): This represents the DAC. Hover your mouse over the icon to see the DAC ID.
- Dataset icon (): This indicates datasets falling under that policy. The number next to the icon tells you how many datasets are linked to the policy. For example, if you see "2" next to the icon, it means there are two datasets linked to that policy.
If you want to check the linked datasets and their relevant information, simply click on a specific policy. You'll then find the "List of linked datasets of this policy" at the bottom of the page.

Datasets
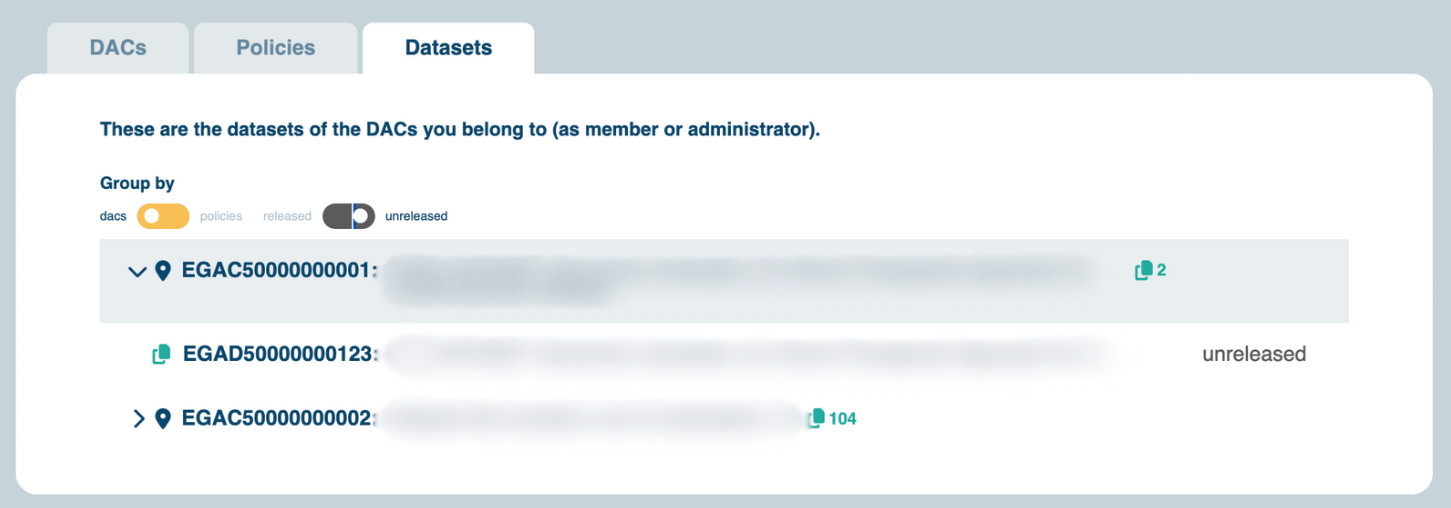
Finally, in the dataset tab, by default you will see a list of all the datasets you can manage with all your DACs and policies.
Yet, we've included two handy ways to organise them:
- DAC vs. policy: You can group by datasets, either by DAC or policy.
- Released vs. unreleased: You can sort out datasets based on their release status.
Deprecation
Do you have a bunch of metadata objects like DACs and policies that you don’t need anymore? This section shows you how to get rid of them!
But what does "deprecation" mean for EGA? It's basically changing the status of a metadata object to "deprecated," which means we won't be using it in the future. In simple terms, it's like saying these objects are no longer useful. However, because we believe in making metadata FAIR, once an object has a persistent identifier, we can't just delete it. So, instead of deleting, we deprecate it.
Here's a helpful tip! If you want to make a metadata object disappear from the DAC Portal, deprecate it. You won’t see it in the portal anymore!
Let’s say you want to deprecate a DAC. Let’s do it!
- Go to "My DACs."
- Select a DAC.
- Click "EDIT" to see more details. You are now in this page:
- Click on the Deprecate button
- It will then appear a message. There are two options here:
- Your DAC is not linked to any policy, hence it’s ready to be deprecated. Click on “Yes. Confirm” to deprecate your DAC object!
- Your DAC is linked to at least one policy, and you need to either:
- Deprecate the linked policy first, or
- Link the policy to a different DAC

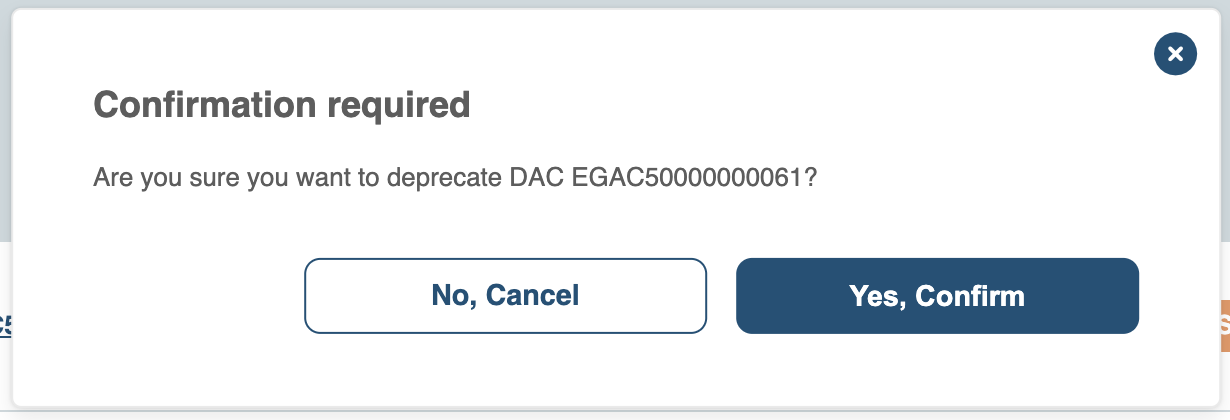
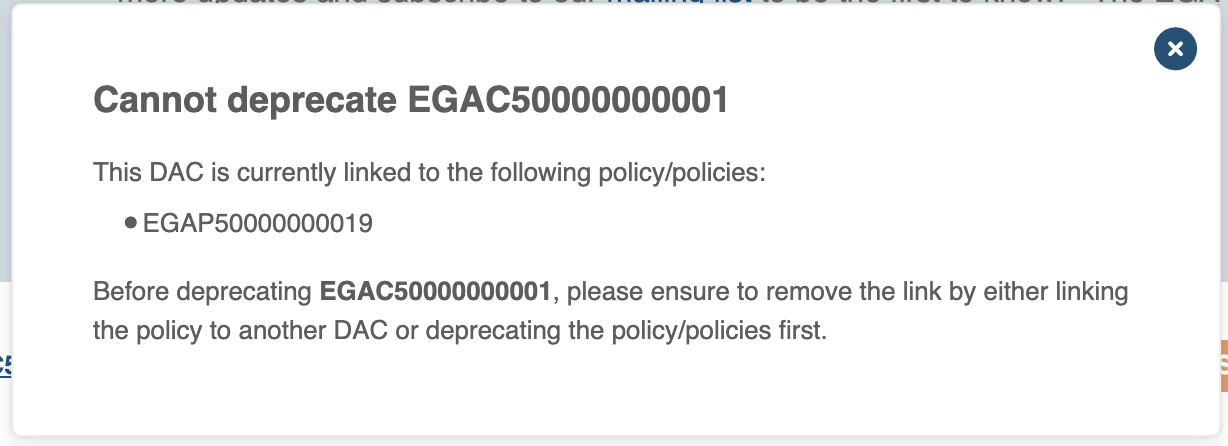
Now, let’s say you don’t want to get rid of the policy altogether, but you want to change the DAC it’s linked to. Here's how:
- Go to the policy tab.
- Find the policy you want to change (for example, EGAP50000000019).
- Choose a new DAC to link it to.
- Click on Update.
See the Edit Policy section for more details.
After ensuring that the DAC we want to deprecate isn’t linked to any policy, return to the "My DACs" section and follow the steps outlined previously. This will lead you to a confirmation message.
You can only deprecate DACs and Policies. To deprecate a dataset, please contact our Helpdesk team.
Check more information on how deprecation works here!
User Preferences
We have implemented email notifications in the DAC Portal. Here’s the complete list:
DACs:
- Pending requests
- Approved by Helpdesk
- Rejected by Helpdesk
- DAC Invitation
Requesters:
- Data access request approved
- Data access request denied
- Permissions revoked
- Upcoming expiration date
As a DAC member, you will be able to decide whether you want to receive the DAC notifications or not. For that, go to the top-right corner menu, select User Preference.

You will be able to decide whether you want to receive notifications for:
- Approved by Helpdesk
- Rejected by Helpdesk
- DAC Invitation
For pending requests, you will be able to select how often do you want to receive the notification:
- Daily
- Weekly
- Fortnightly

As a DAC member, you are responsible for managing data access requests. Consequently, you will receive notifications for pending requests. If you prefer not to manage these requests, please arrange to be removed as a contact for your DAC.
Here's a tip!
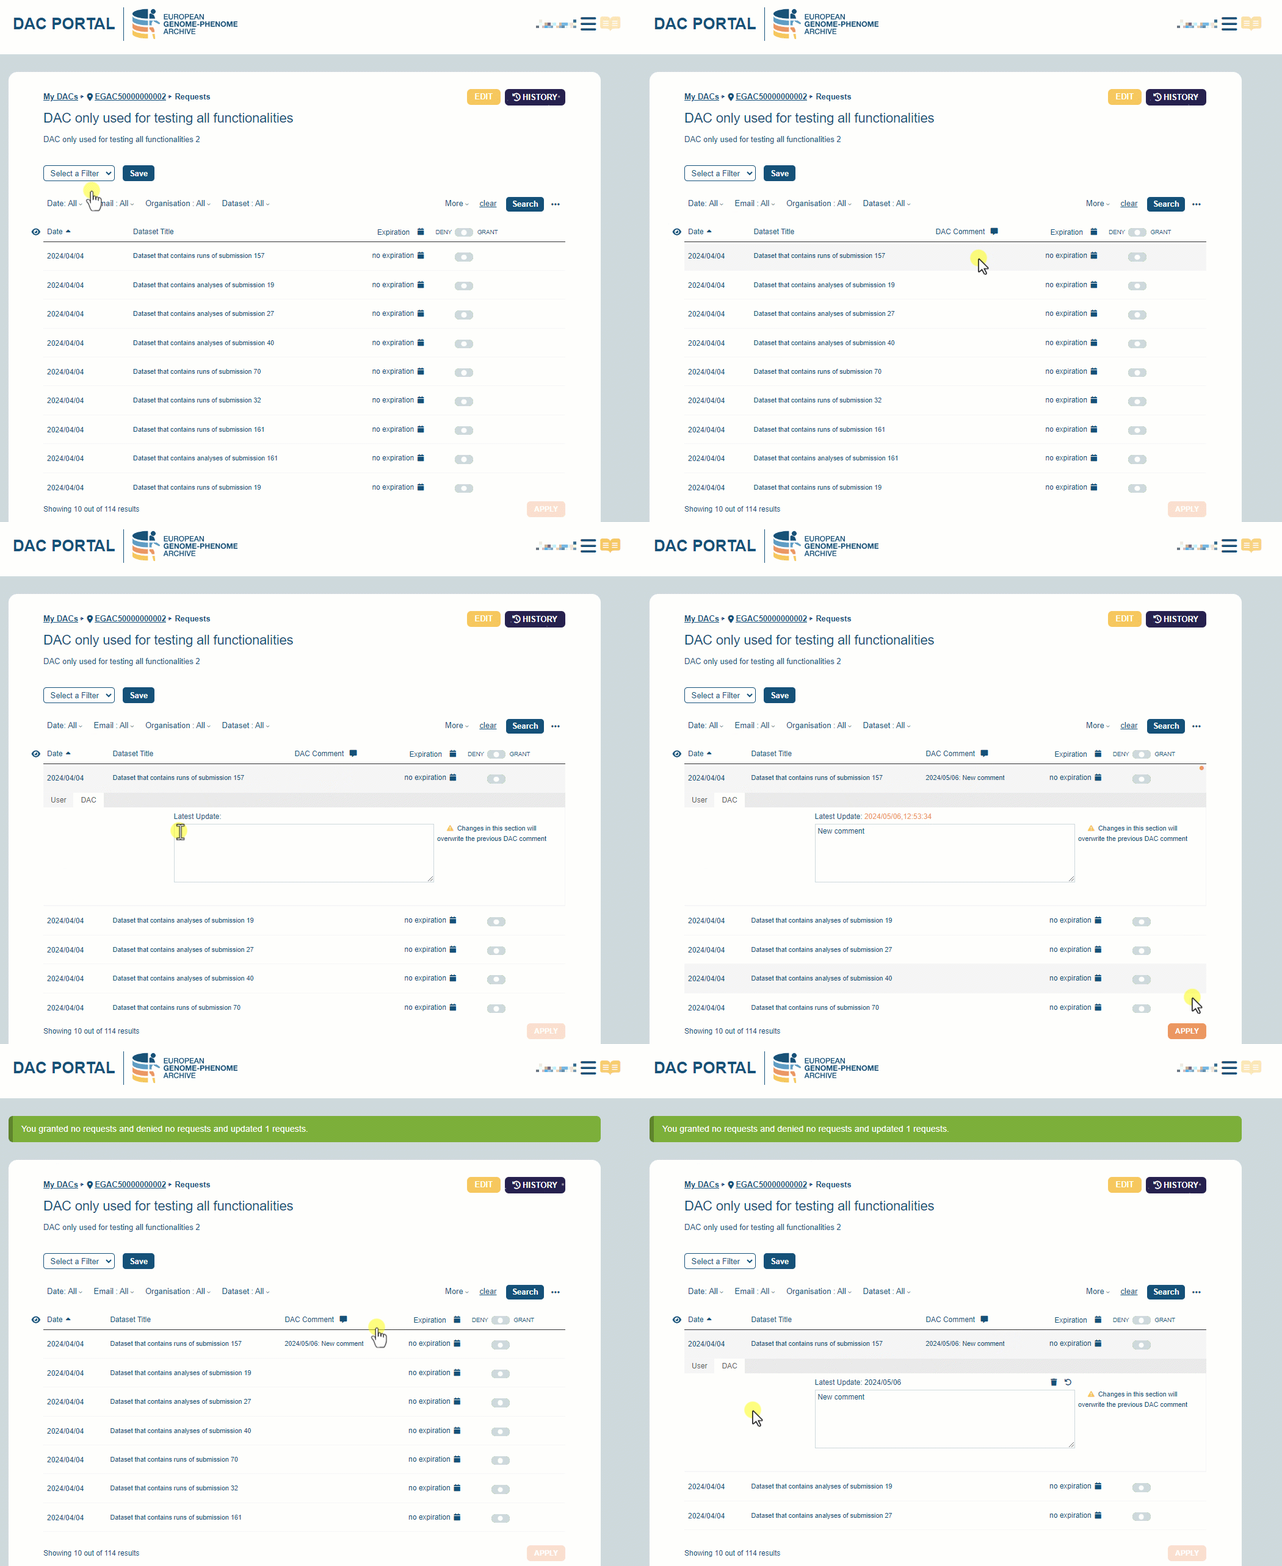
Do you have a pending request that you don’t want to receive a notification? Add a DAC comment! The EGA understands that a request resolution can take some time, for this reason, if you add a comment (make sure you save it by clicking the APPLY button!) we will filter those requests at the time of sending the notification!
DAC API - A programmatic approach
In addition to the new DAC Portal, we are excited to announce the release of the DAC API. This enables users to programmatically manage permissions. If you are interested in learning more about the technical specifications, you can click the button below.
